Showing posts with label vegetarian. Show all posts

Monday, July 15, 2013

AuntaLee's Sugar Cookies

My sister, now known as AuntaLee by all the assorted nieces and nephews, found this absolutely amazing sugar cookie recipe a few years ago when my son was little.  We grew up on our Gramma's sugar cookies, but the recipe she found........soooo good.  It's probably got something to do with the 1.5 cups of butter.

I love whipped butter and sugar......so fluffy, so sinful.....

Last month, when Little Man turned 7, he got a giant duck cookie cutter for his birthday.  Let me back up a minute and explain that he loves ducks.  LOVES.  I don't know where it came from, but there it is.  He has been chomping at the bit to make some duck cookies, but everytime he's asked about it, the timing is off.  It's late Sunday afternoon, or I just made banana bread, or we didn't have butter.


On Saturday, the stars aligned.  He went to run errands with Grammy-Gram, and I cleaned the kitchen.  In the process, I realized that if I made the cookie dough while he was gone, it would have time to chill, and we could have the cookies finished before church Saturday night.  Imagine his glee when he came home to discover that I had sugar cookie dough chilling in the fridge.


Cookie Dough...........

Be liberal with your flour- this stuff gets sticky once it warms up a bit.

He was very patient in waiting for the dough to be ready (I let it chill about 2 hours.  Overnight makes it too stiff to really roll out.)  Then began the fun of rolling and cutting.  We had our giant duck cookie cutter, as well as a little duck cookie cutter.  We alternated filling pans of BIG Quacks and little Quacks.


Ducks in a row.......


One note- These cookies do not brown on top.  They stay very pale and soft.  The first time I made them, I overbaked them waiting for them to turn brown on top.  Check the bottom instead.

These guys are baked......see how pale they are?

But their bottoms are perfect!


Once they were baked and cooled, we had just enough time to ice them with "ducky yellow" lemon icing, which is fairly easy to create, and extremely delicious on these cookies.  For the smaller cookies, the dipping method was the easiest way to ice them.  For the big ducks, I used a spoon to dump some icing on the cookies and then spread it out.  Kiddo added yellow sprinkles to some, but we made sure to ice ALL the cookies.  Otherwise, I end up with a container of unadorned, uneaten, stale sugar cookies.  And that's just sad.

I think he ate as much icing as he used.......


Without further ado, I give you.......AuntaLee's Sugar Cookie Recipe, as well as a quick primer in how to make lemon icing.


AuntaLee's Sugar Cookies

 1 1/2 Cups (3 sticks) Butter, softened
2 Cups white sugar

4 Eggs
1 Tsp Vanilla

5 cups flour (I use 2 cups white whole wheat and 3 cups all purpose)
2 Tsp Baking Powder (Rumford or Trader Joe's are the best ones)
1 Tsp Salt

1) Beat butter and sugar until smooth and fluffy

2) Add eggs and vanilla, beat until combined and fluffy

3) Add flour, baking powder, and salt  (I use my dough hook for this part)

4) Cover and chills dough for at least 1 hour.

5) Preheat oven to 400 degrees

6) Roll out dough- about 1/4-1/2 inch thick

7) Cut into shapes and place on ungreased cookies sheet.

8) Bake 6-8 minutes (look at the bottoms, not at the tops!)

9)  Cool completely, ice with lemon icing, and ENJOY!

Mama's Lemon Icing

Take about 2 cups of powdered sugar and mix in straight lemon juice to desired consistency.  It makes a lemonade type icing that is so good on these cookies!  We also added yellow food coloring so our ducks would be yellow. 

Here's how I dip them:


Holding the cookie upside down, touch the face of the cookie to the icing.  Don't push it down into it or you will end up with WAY too much icing.  


When you pull it back up, let the extra drizzle off for a few seconds and then turn the cookie over and let it dry on a wire rack.  Some may run off the sides on the first few while you get the hang of it.  Don't worry- they are still delicious. 


Questions, comments, concerns- let me know below.  I would really love to hear about your Hippie adventures. 

Peace & Love Y'all- Hippie Mama

Thursday, July 11, 2013

Choosy Moms Choose..........Hippie

My son hated peanut butter.  Hated.  Jif, Trader Joe's, Peter Pan, Creamy, Crunchy................nothing worked.


So I gave up.

Until.......I tried Hippie.

Oh Yeah.  Hippie Peanut Butter hits the spot.  He LOVES my Hippie peanut butter.  And who can blame him?  It's fresh and he watches it go from peanuts to peanut butter before his big brown eyes.


There is something magical about watching something morph or grow or change.  As soon as we get home from school/work every day, he is in the garden, checking to see what's grown, what's changed.  When I make bread, he likes to watch me work with the dough and then watches it bake through the little window on the oven door.  He is learning to make his own cookies, and prefers to test the dough before they are baked and then eat them hot immediately after, complete with dramatics of "MAMA!  These are TOO good!  MAMA!" 

This kid is the kid that steals cooling pies off windowsills and eats them in the hayloft. 


My favorite part of making Hippie Peanut Butter is how easy it is.  And I know what's in it.

Here's what's in Jif Creamy Peanut Butter:
MADE FROM ROASTED PEANUTS AND SUGAR, CONTAINS 2% OR LESS OF: MOLASSES, FULLY HYDROGENATED VEGETABLE OILS (RAPESEED AND SOYBEAN), MONO AND DIGLYCERIDES, SALT.

Uh-huh.  Rapeseed?  What is that?  Mono and diglycerides?  Ew.

Here's what's in Hippie Peanut Butter:
Peanuts, Salt.


Uh-huh.  See what I'm saying?

So let's get down to business, shall we?

First things first- peanuts.  I go to (surprise surprise) Trader Joe's and get my peanuts there.  I use one bag Honey Roasted (so obviously more than just peanuts- I know) and one bag 50% less salted.  The combination is ideal for my family, who prefers their peanut butter be a little sweeter than just straight peanuts, and the 50% less salt helps keep the saltiness and sodium in check. 


You may use whatever peanuts you prefer.  And if you feel a little "yeah, right Hippie Mom, homemade peanut butter.  Psh."  Then make a small batch first to try it. 

Here's what you do:

Dump the peanuts in the food processor. Press go.


If you have a teeny tiny food processor, please be aware that you may have to give the little motor cooling breaks so you don't fry it.  Not that I'm speaking from experience or anything.  Let's just say that after I made my first batch, I received a new GIANT food processor that can handle the load and doesn't smoke when I use it.  

At first, the peanuts look like pebbly dirt. 

Peanut Pebbles..........

Then they start to clump. 

It's hard to get a good picture of peanuts in the processor........

Then they do what I call the Peanut Tsunami where this giant peanut wave works its way around the processor bowl, devouring all the other peanut pieces. 

Eventually it starts to smoooooth out. 

Smooooooth


When it hits smooth and creamy, without any weird lumps or bumps twirling around in there, it's done.  (If you like crunchy, toss in some more peanuts and run the processor again just to break them up into smaller pieces.)  

Refilling the Hippie jar.

Go ahead and taste test it- it will be a little soft and warm.  Grinding peanuts causes friction, which causes heat.  It's all good, because warm, soft peanut butter pours so much easier into a jar.  (I use an old Jif jar, or a glass Mason jar- whatever is handy.)  Once you pop it in the fridge for a few hours, it will stiffen up to a firmer consistency, or you can leave it out and it will stay soft.

Deliciousness......


Once you realize how easy homemade Peanut Butter really is, you can make it and give it to your friends and family.  Introduce them to the wonder that is Hippie living.  A fresh loaf of bread, a jar of Hippie peanut butter, and a jar of local Honey would make an excellent housewarming or hostess gift. 


Questions, comments, concerns- let me know below.  I would really love to hear about your Hippie adventures. 

Peace & Love Y'all- Hippie Mama


Tuesday, June 4, 2013

Doughnut Muffins

Yeah, you heard me.

Doughnut Muffins.

And they are good too.

I grew up on freshly made doughnuts.  My Dad would pull out the Fry Daddy, mix up a batch of Hazel's Donuts, and fry up some hot, fresh, melt-in-your-mouth deliciousness.  Hazel was a family friend of ours and I am not about to give up her donut recipe.  My Gramma would invite us kids over, set us up on the screened in porch and deliver hot, fresh, deep-fried baking powder donuts, which we would immediately slather with orange flavored cream cheese frosting (which melted into ooey goodness all over our fingers, hands, and faces- hence the reason we ate them outside on the porch).  We would eat until we had to lay next to our bellies groaning with agony and delight.  They were that good. 

When I came across a doughnut muffin recipe at King Arthur Flour, I thought- yeah, right.  It can't possibly be as good as the real thing.  And I was right!  It was a little bland.  (HA- sorry King Arthur!)  Lucky for you though, I am willing to dink around with my recipes until they are just perfect and this one finally hit it's perfection level last week.  The sad part is that I have almost no pictures of the process because I didn't know it was going to turn out so well.

Still dubious about them?  My son ate 3 in one sitting (unheard of), and rather than tossing stale muffins to the chickens 3 days later- there were none to be found.  NONE.  They were gone- toasted, buttered, and devoured. 

Before you start, you should know that this is not your average muffin batter.  It is thick, it requires a good beating, and it's more cakey than muffiny. 

The one and only (crummy) photo of my successful muffins.  (AHAHA- see what I did there?)


DOUGHNUT MUFFINS

Batter:

  • 1/4 cup butter
  • 1/4 cup COCONUT oil  (Yes, it must be coconut oil- it gives them an amazing flavor- it doesn't taste like coconut though, so don't worry if you hate coconut.  It just adds a nice depth to them.)
  • 1/2 cup granulated sugar
  • 1/3 cup brown sugar
  • 2 large eggs
  • 1 1/2 teaspoons baking powder  (I use Rumford or Trader Joe's Baking Powder.)
  • 1/4 teaspoon baking soda
  • 1 1/4 teaspoons ground nutmeg (I tend to add a little more)
  • 1 teaspoon ground cinnamon
  • 3/4 teaspoon salt
  • 1 teaspoon vanilla extract
  • 2 2/3 cups unbleached all purpose flour
  • 1 cup milk
Topping:

  •  1 1/4 cups All-purpose flour
  • 1/2 cup brown sugar, firmly packed
  • 1/4 teaspoon salt
  • 3/4 teaspoon cinnamon
  • 1/2 cup (1 stick, 4 ounces) butter, melted
  • 1 teaspoon vanilla extract


1) Preheat the oven to 425°F. Lightly grease a standard muffin tin. Or line with 12 paper or silicone muffin cups, and grease the cups with non-stick vegetable oil spray; this will ensure that they peel off the muffins nicely. 

2) In a medium-sized mixing bowl, cream together the butter, coconut oil, and sugars till smooth.

3) Add the eggs, beating to combine.

4) Stir in the baking powder, baking soda, nutmeg, cinnamon, salt, and vanilla. 

5) Stir the flour into the butter mixture alternately with the milk, beginning and ending with the flour and making sure everything is thoroughly combined. 

6) Spoon the batter evenly into the prepared pan, filling the cups nearly full. 

7) Make topping by combing all the ingredients and mashing and mixing with a fork.  It will start to clump up a little (that's good- those are the tasty crumbs!)

Sprinkle the tops generously with the topping, patting it ever so slightly to ensure that it sticks.

8) Bake the muffins for 15 to 17 minutes, or until they're a pale golden brown and a cake tester inserted into the middle of one of the center muffins comes out clean.  (I've had them bake as long as 20 minutes, depending on the weather, etc.)

9)  EAT!  NOM NOM NOM................this recipe makes about 12 regular size muffins.  You can also make them in one of those doughnut pans they sell, but I've never had much luck with that.  


Tuesday, May 28, 2013

"Vegetarians can't grill..........."

.......or so they say..........

No, really- they do.  It's summertime- I talk about how much I love to grill.  Most people who actually know me are a little ........whaaa???.........you?  grill?........but aren't you mostly vegetarian?  What can you possibly GRILL?!  Grills are for MEAT!  Grills are for MEN!  ((insert man grunts))

Um....no.  My ex-husband actually set the grill on fire and made the worst hamburgers EVERY single time he started the grill. (*snickers*)

I'm a bit more gifted with the flames of wonder and might.

And I do it with veggies.


RAAAAH!

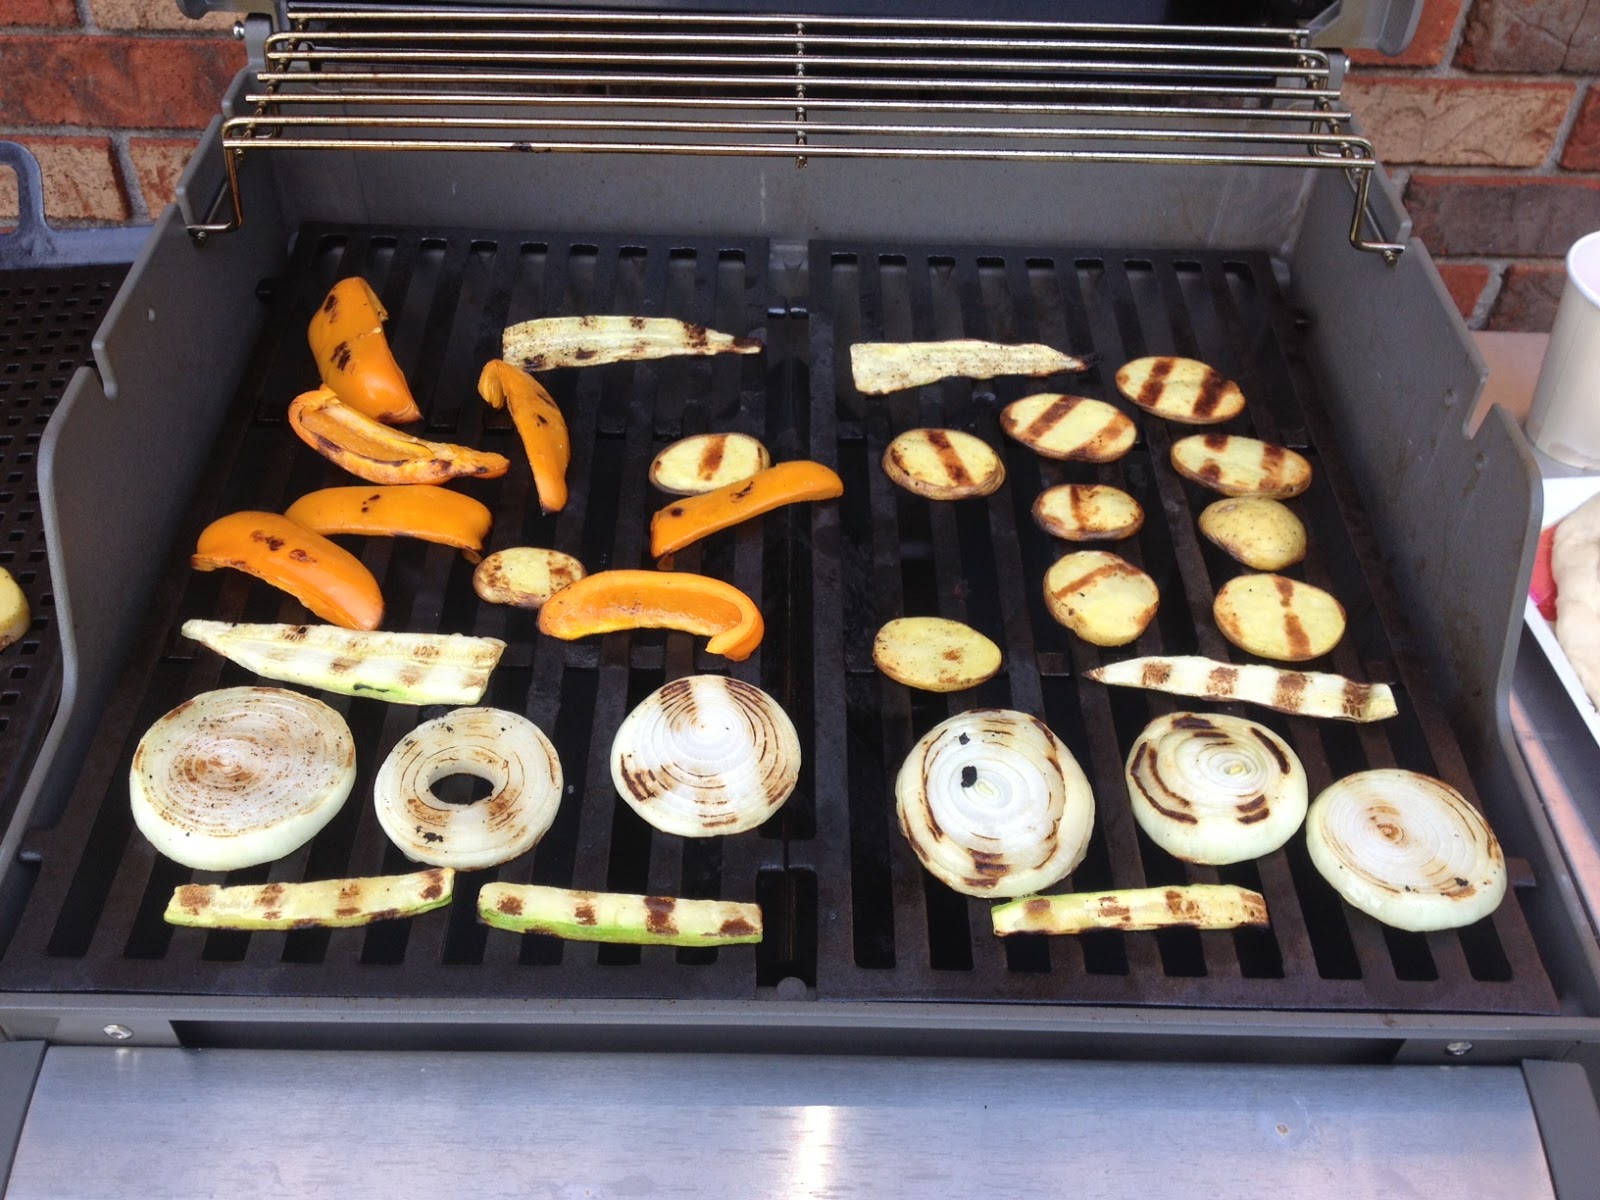
But seriously.........it's easy.  Vidalia sweet onions, peppers, potatoes, tomatoes, zucchini......whatever you have on hand.  I toss it in olive oil, sprinkle it with a little salt, a little pepper, maybe a dash of cajun seasoning for a little kick and toss it on a hot grill.   Be careful- the potatoes will try to fall between the slats of the grill. 


SHAZAM!!


And then........I drizzle it with some Balsamic Vinegar Reduction.  It's like a magic potion.  It's easy.  Take about a cup of balsamic vinegar, pour it into a saucepan and bring it to a low boil- add about 1 tsp of sugar (raw if you have it) and let it simmer until it reduces by about half.  It's so good- you've got to make some.  You will be drizzling it on salad, raw veggies, grilled veggies, pizza, bread.....pretty much anything.


But wait.......I also make the bread on the grill.  Yeah- grilled bread.  Trust me. 


You make a pretty basic ball of dough, divide it, flatten it, cover it with olive oil and grill it.............


Oooooooo........yeah.

Take 1/2 tsp of Active Dry yeast and add it to 1/2 cup of really warm water- mix it in until it dissolves and let it sit for 5 minutes.

Now......add 1 Tablespoon of olive oil, 1 tsp of salt, and 1 1/3 cups of flour.  Mix it up into a dough ball and knead on a floured surface for about 2 minutes.  Let it rise for 30 minutes.  (Turn on the grill- let it get hot- grill veggies- by then, you will be ready for the bread.)

Take your dough ball and divide it into 4 hunks and flatten them out into discs (or roll them out- your choice).  They will look like little naked pizzas.  Brush them with olive oil and toss them on the hot grill.  See what they look like in the picture above?  Yup- that's the goal.  It doesn't take long.  Maybe 3-5 minutes per side, depending on how well done you like your bread.  Be sure to shut the lid and hold all the heat in to bake them.  Be sure to brush them with olive oil before you flip them.  You can also sprinkle them with Italian seasoning, or whatever you like.  (Again- they are good with a little balsamic reduction........)

There you go- how to be a Bad Mother Griller......without meat (or any animal anything.)

Yeah- I don't post often enough, but when I do- it's totally worth it.  :)


Thursday, April 11, 2013

Hippie Runner Granola

Granola.  Gotta love it, right?

But not the store bought kind.  They put stuff in there.  Preservatives and junk, you know?

Blech.

Let me tell you about homemade granola and how easy it is.  My Gramma always made us homemade granola bars.  I like to make homemade loose granola cereal.  I do a cinnamon chocolate pecan almond granola.  That's what I'm about to show you how to make.  BUT, it is really simple to play around with this recipe.  I did- that's how I came up with this variation.  I looked on Pinterest for granola recipes, tried one, and then dinked with it until I created my perfect granola.  (Which is absolutely delicious mixed in with some vanilla yogurt!)

My *very* official recipe  (Vegans can substitute coconut oil for the butter!)


Here's my very secret and official recipe.  Intense, right?  First things first- gather your stuff!!


The line up.
I'm not fancy, as you can see by my containers.  I use local raw honey.  The bag in the middle contains the raw pecans that I picked up at Kroger.  The bag on the right has Trader Joe's Cinnamon Almonds in it.  They are so good.........so I use those instead of raw almonds.  But raw almonds are awesome too!  The bottom right is coconut- it's totally optional.  If you look back up at the post-it, there is nary a shred of coconut listed, but I threw it in to see what would happen.  Not much- the cocoa and cinnamon over-ruled it.  Oh well.


Everyone needs a good heavy-duty spatula!!

You know what you DON'T see?  Raisins!

I love raisins.  My first batch of granola had raisins in it.  But.........put raisins in the oven for 30 minutes and they actually turn into little pieces of gravel and you will end up picking them ALL out of your granola.  Trust me.

Cinnamon Almonds--Chop 'em up!

Now- chop up them nuts!  You don't want big old hunks of nuts in your granola, so chop them up.  They don't have to be chopped into oblivion, just chunked up so they can mix with the oats, etc.

Raw Pecans--Chop some more!

Nuts actually chop up really easily and nicely.  Even the roasted cinnamon almonds.  And if you like walnuts, add those too.  I don't like walnuts and my sister is allergic, so I don't like to run the risk of setting her into anaphylatic shock.  I keep a walnut free house.

Mix the dry.
Once you've mixed all the dry stuff together so that everything is coated and the cinnamon and cocoa smell is making you hungry, add the honey and melted butter!  (Vegan??  Use coconut oil instead!)


Add the honey and mix some more
Really mix the honey in, so that it coats everything!  Add a little extra if you want to.  This isn't an exact science.  Recipes are like the Pirate Code- they're really just guidelines.  You can taste it too.  It's nummy.  You could probably add chocolate chips to this shindig too.  Or maybe cinnamon chips.


Put it on a baking sheet

Now that you have a gooey mass of deliciousness, dump it all on a baking sheet.  Then throw it in the oven at 315 degrees for about 25-30 minutes.  Be sure you reach in a stir it around every 8 minutes or so.  It ensures that everything will brown nice and evenly. 

NOM NOM NOM

When it's done, pull it out, and try it.  It should be wonderfully crunchy and tasty.  Once it cools off completely, put it in an airtight canister or container.  I don't know how long it keeps because we never have it around that long.  I've put it in yogurt (sometimes with bananas), mixed it into my oatmeal, had it straight with milk, eaten it dry for a snack, sprinkled it on ice cream.......the possibilities are endless.

If you try it and like it, let me know.  If you try it and add something new, let me know.  If you try it and it comes out wonky, tell me that too.   But don't say I didn't warn you about the raisins!!!

Friday, February 15, 2013

Lent and Shepherds' Pie

This week was the start of Lent, beginning on Wednesday with Ash Wednesday.  Everybody in my house went to Mass and received ashes and fielded questions the rest of the day about the "dirt" on our foreheads.  It's one of the days of the year when my Catholicism is displayed and I am very proud of that.
I was walking into the grocery store and trying to look nonchalant about taking a picture of myself.  :)


Lent is also the time when we give something up, whether it is a material or spiritual in nature.  The goal is to come closer to Christ by giving up those things which distract or tempt us.

I gave up chocolate and ice cream.  I know it sounds kind of silly, but really, it is a great weakness for me and to fend off the temptations literally handed to me is going to be a great challenge.  For instance, my catechumen gave me a box of chocolate covered strawberries for Valentine's Day yesterday.  She was so excited to present them to me and I hated to tell her that as much as I appreciated and admired the gesture, I couldn't eat any of them because of my chosen Lenten fast.  I ended up sharing them with the rest of our (small) parish, so already I am seeing the physical fruits of my decision.  My kiddo has decided that 1) he is going to go through all his books and give some away to other children and 2) we are going to say 10 Hail Mary's every night before bed.
 
There are moments that stand out as a parent and last night was one of them.  We snuggled on his bed to say our prayers and I brought out two rosaries and taught him how to count Hail Mary's on the beads as we prayed.  I think he may find his very own rosary in his Easter Basket this year.

Family rosaries, including two from the Vatican


The other aspect of Lent is the "black fast" which basically means that we don't eat meat on Fridays.  The "limited time only!" fish sandwiches at all the fast food places make their appearance about a week or two before Ash Wednesday and then disappear shortly after Easter Sunday.  So, during Lent, I will be sharing some of my favorite meatless recipes with you on Fridays.

I have a subscription to Vegetarian Times magazine and that's where this recipe comes from.  It is easy to make and so delicious, I hope you will try it.  The spice of the filling is balanced by the sweet cornbread topping.  And if you've never tried Greek Yogurt as a replacement for sour cream, this is your chance.  You won't be sorry!  As always, if I have any modification ideas or tips, I will put them in colored italics within the recipe. 

Cornbread and Pinto Bean Shepherd's Pie

2 14.5 ounce cans Pinto Beans, drained, but reserve 1.5 cups of the bean liquid
I like black beans, so I will substitute one can of black beans for one of the pinto beans
3 Tbs Tomato Paste
1 Tbs olive oil
1 large red onion, cut into 1/4 inch dice (2.5 cups), divided
2.5 Tbs chili powder
3 medium plum tomatoes, seeded and chopped (1.5 cups), divided
I use any tomatoes I have on hand, and never mind the seeding bit.  Tomato seeds never hurt anyone!
6 Tbs whole-grain cornbread and muffin mix
I use Jiffy cornbread mix!
1 1/3 cups plain nonfat Greek yogurt, divided
1 Large egg
1 Tbs water
1.5 Tbs sugar

1)  Place oven rack in top position, and preheat oven to 425.  Coat 9-inch pie dish with cooking spray.  I use my biggest, deepest pie dish or a casserole dish.  Whisk the reserved bean liquid with the tomato paste.  (I've used salsa instead of this combo and it was spicy, but delicious.  About 1 cup salsa and 1/2 cup of the bean juice.)

2)  Heat oil in a large skillet over medium-high heat.  Add 2 cups onion.  Cover, and cook 4 minutes, or until onions begin to soften, stirring occasionally.  Add chili powder, and stir 10 seconds to coat onions.  Stir in tomato paste mixture (or salsa mixture), 1 cup tomatoes, and then beans.  Bring to a simmer, stirring occasionally.  Reduce heat to low and simmer uncovered, 6 minutes, or until the flavors blend and the chili liquid thickens.  Season with salt and pepper, if desired.


This is in the pie plate, and you can see the black beans I added.  But doesn't it look good!!!???

3)  Meanwhile, combine the cornbread mix, 1/3 cup yogurt, egg, sugar and 1 Tbs water in medium bowl.  This will be really soupy, so that it can be poured on top of the bean concoction.  
The first time I made this, I thought it was too soupy, so I added more mix to it and I ended up with giant cornbread muffins on top of my beans instead of just a crust!  HA!


4)  Spread chili beans in prepared pie dish.  Pour cornbread batter over beans, spreading with back of spoon.  Bake 10 minutes, or until cornbread is set and golden.

Mixed the right way, it spreads out very nicely, thank you!


5)  Meanwhile, finely chop remaining 1/2 cup onion.  Place in small bowl and mix in remaining 1/2 cup tomatoes, and season with salt and pepper.  (This may not seem like much, but it really makes the dish!)

6)  Divide shepherd's pie among shallow bowls.  Serve with tomato salsa and remaining yogurt.   

NOM NOM NOM!